
43. THREE- INGREDIENT CHOCOLATE CAKE
What: This recipe is adapted from American cooking magazine Cooks Illustrated. The cake is moist and chocolatey and has a mousse-like texture. Sugar is optional and it contains no flour - good for those looking for a gluten-free cake.
Ingredients: 450g dark or semi-sweet chocolate, coarsely chopped 227g unsalted butter, cut into small pieces (keep a piece to grease the pan) 8 eggs, cold
Optional garnishes: Icing sugar, berries
Method:
1. Preheat oven to 160 deg C.

2. Place the chocolate and butter in a microwave-safe bowl and melt them on medium heat, in 30-second intervals, in a microwave oven. Stir after each cycle. When the chocolate and butter have melted into a smooth mixture, remove from the oven.
3. Line the bottom of a 9-inch springform pan with parchment paper and grease the sides with butter.
4. Wrap the exterior with two sheets of aluminium foil and set it in a large roasting pan, or any pan larger than the springform. Bring a kettle or pot of water to a boil.
5. Whisk eggs at high speed in an electric mixer until the volume doubles. This takes about five minutes.
6. Fold the beaten eggs with a spatula into chocolate mixture in three batches until it is smooth.
7. Pour the mixture into the prepared springform pan and smooth out the surface with a spatula.
8. Put the springform pan in the roasting pan. Carefully, pour in boiling water to about halfway up the sides of the springform pan. Then, with oven mitts, place the roasting pan carefully into the oven in the middle rack.
9. Bake 20 to 22 minutes. The cake is ready when it has risen slightly and the edges have set. Insert a skewer in the middle, it should come out clean.
10. Remove the springform pan from the hot water. Place it on a wire rack. Let the cake cool to room temperature, then cover and refrigerate until chilled.
11. Before serving, remove cake from springform pan and invert it onto a flat dish. Peel off the parchment paper and re-invert the cake onto a serving platter.
12. If desired, dust with icing sugar and garnish with berries before serving.
Serves six to eight
Tip: Depending on whether you have a sweet tooth, use a mix of semi-sweet and dark chocolate for the batter.
Eunice Quek
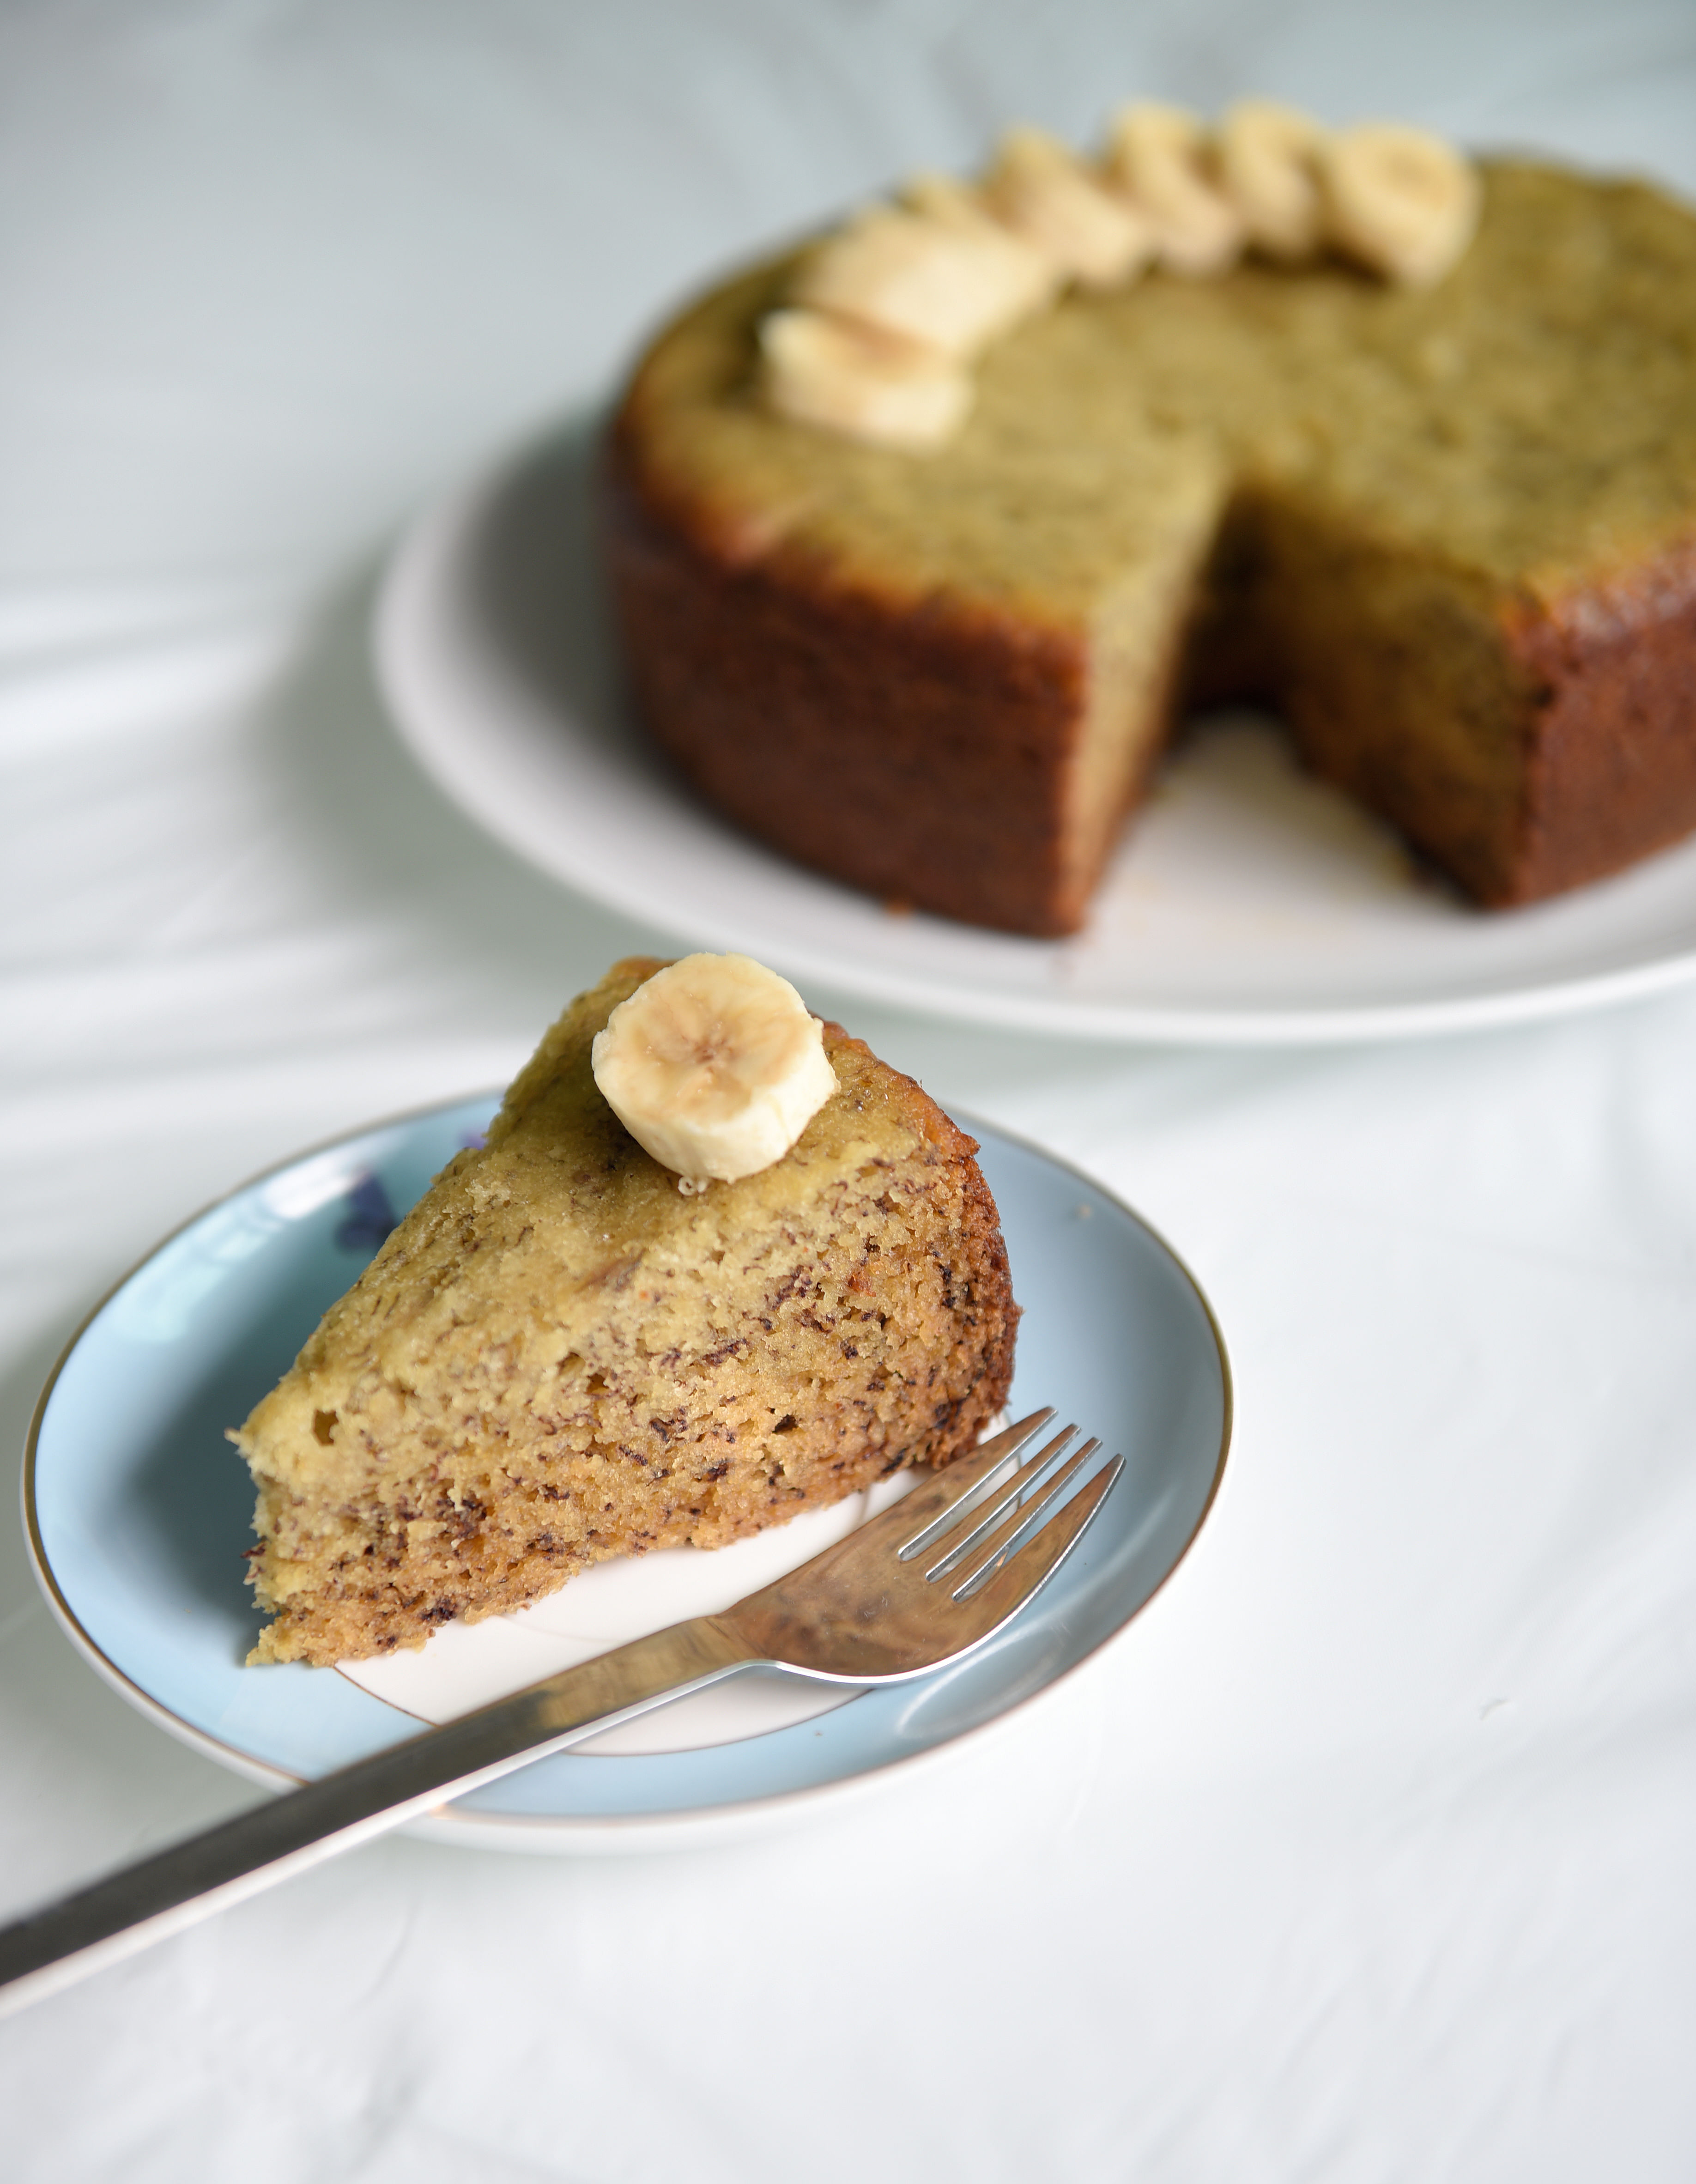
44. MAKING BANANA CAKE IN A RICE COOKER

What: No oven at home? No problem. You can turn out a decent banana cake with the ubiquitous rice cooker.
I used an old-school electric rice cooker that requires users to just press a button to start cooking.
It is more tiresome, as the cooking cycles are shorter - from one to four minutes - unlike multi-function rice cookers, which can cook for about 10 minutes at one go.
Besides waiting for the cake to cook, I also had to wait for about five minutes after each cooking cycle for the rice cooker's thermostat to be reset.
Only then could I press the button again for the appliance to switch from "keep warm" to "rice cooking" mode.
The "baking" process took eight cooking cycles and 55 minutes in total.
However, it is worth the trouble when the banana cake pops out moist and soft.
Ingredients:
250g self-raising flour
2 tsp baking powder
11/2 tsp baking soda
250g white sugar
5 eggs
3 large bananas, peeled and mashed
150g unsalted butter, melted
Aluminium foil
2 Tbs vegetable oil
Sliced banana to garnish
Method:
1. Sift flour, baking powder and baking soda into a mixing bowl and set aside.
2. With an electric mixer on low speed, whisk sugar and eggs in another mixing bowl till the mixture becomes light and creamy.
3. Add mashed bananas into the egg mixture and whisk till the bananas are fully mixed in.
4. Fold in sifted flour mixture gently, then fold in melted butter quickly.
5. Brush the insides of a rice cooker pot with vegetable oil.
6. Cut a round piece of aluminium foil that is the same size as the diameter of the rice pot, and line the pot with it. Brush oil on the aluminium foil.
7. Pour batter into the rice pot. Press the button of the rice cooker and cook till it pops up and the pot switches to "keep warm" mode. Wait for about five minutes before pressing the button again to return to "rice cooking" mode.
8. Repeat the above step seven times. To check if the cake is completely cooked, insert a toothpick into it. If it comes out clean, the cake is ready. Pat the cake surface to check that it is firm and dry.
9. Remove the pot from the rice cooker. Place a plate larger than the pot over it and flip it upside down to turn the cake onto the plate.
10. Carefully peel off the hot layer of aluminium foil.
11. Place another large plate on top of the cake and flip it back. Garnish with banana slices and serve.
Serves 10
Tips:
1. Lining the bottom of the rice pot with aluminium foil and oiling the sides make it easier to wash the pot afterwards.
2. Do not press the rice cooker switch button continuously as that will overwork the pot's heating element and burn the cake bottom.
Kenneth Goh
45. ONE-PAN PASTA

What: For a fuss-free meal without having to wash extra pots and pans, celebrity chef Martha Stewart's one-pan pasta is an easy option. It was first published four years ago and is now one of the most popular one-pot recipes.
Ingredients:
340g linguine
340g cherry tomatoes, halved or quartered
1 onion, peeled and thinly sliced
4 garlic cloves, peeled and thinly sliced
1/2 tsp red pepper flakes
2 sprigs basil, plus torn leaves for garnish
2 Tbs olive oil, plus more for serving
2 tsp salt
1/4 tsp pepper
1.25 litre water
Grated parmesan cheese
Method:

1. Place the pasta, tomatoes, onion, garlic, red pepper flakes, basil, oil, salt, pepper and water in a large pan with a flat base. The water should be enough to cover the ingredients. Bring to a boil over high heat.
2. Cook for about nine minutes, stirring and turning pasta frequently with tongs, until it is al dente and the water has almost totally evaporated.
3. Remove the cooked basil.
4. Season to taste with extra salt and pepper, and divide among four bowls.
5. Garnish with extra chopped basil and parmesan. Drizzle olive oil over each portion and serve.
Serves four
Tips:
1. Since there is not much sauce after the dish is cooked, you can toss it with some tomato paste before serving. You can also add fresh tomatoes as those cooked with the pasta will be mushy.
2. The linguine can be substituted with other pasta shapes, including short ones such as fusilli or penne.
Eunice Quek
46. OMELETTE COOKED IN A RESEALABLE BAG

What: This recipe is adapted from Allrecipes, a website where home cooks can share their recipes. You can use pretty much any ingredient you want.
Ingredients:
2 eggs
2 slices of ham, diced
30g grated cheddar cheese
10g onion, diced
20g green or yellow bell peppers, diced
20g tomatoes, chopped
2 fresh mushrooms, sliced
Method:
1. Sit a 1 litre resealable freezer bag in a bowl and crack the eggs into it. Press out most of the air and seal the bag. Shake or squeeze the bag to beat the eggs.
2. Open the bag and add the rest of the ingredients. Squeeze out as much air as possible and seal the bag.
3. Bring a pot of water to a boil and place the bag in it for 13 minutes.
4. Use a pair of tongs to remove the bag from the water. Open the bag and carefully tip the omelette out onto a plate. It should roll out easily. Serve immediately.
Serves one
Tips:
1. Some recipes recommend placing up to eight bags at a time in the boiling water, but unless you have a very big pot, it is better to cook one or two at a time.
2. If the amount of ingredients you have put in looks more than the egg, just add another egg. It should cook in the same amount of time.
Eunice Quek


What: Making ice cream at home does not require a complex churning machine. All you need is an electric mixer to blend together condensed milk, vanilla essence and whipping cream. Freeze the mixture in a loaf tin and expect to scoop out silky smooth vanilla ice cream six hours later. If you are feeling adventurous, mix in ingredients such as fruit puree or cocoa powder.
Ingredients:
1 can sweetened condensed milk (397g)
2 tsp vanilla essence
480ml whipping cream
Method:
1. In a mixing bowl, combine condensed milk and vanilla essence. Mix well.
2. In an electric mixer, whisk the whipping cream until stiff peaks form.
3. Using a spatula, fold the cream into the condensed milk mixture until they are well-blended.
4. Pour the runny mixture into a loaf tin measuring 27cm by 15cm by 7cm and cover the tin with cling wrap.
5. Freeze for at least six hours, until the mixture solidifies.
6. Scoop out the ice cream and serve.
Serves five
Tips:
1. Chill the mixing bowl, detachable beaters and whipping cream in the refrigerator before whisking the cream with an electric mixer. This allows the cream to be whipped more easily.
2. The biggest challenge in making no-churn ice cream is whisking the whipping cream until stiff peaks form. Be careful not to over-whisk the mixture or you may end up with butter. To check for stiff peaks, dip a whisk into the batter and see if the cream is firm and points upwards when you take it out of the cream.
Kenneth Goh
48. THREE-INGREDIENT 7-UP SCONES

What: While they do not rise as well as normal scones, these 7-Up ones have a similar moist texture. Slice them horizontally and fill with jam and cream or butter.
Ingredients:
1 cup heavy whipping cream, plus extra for brushing the scones
375ml 7-Up or Sprite
4 cups self-raising flour, plus extra for kneading
Method:
1. Preheat oven to 230 deg C.
2. In a mixing bowl, mix whipping cream and 7-Up with a spatula.
3. Add flour and mix well. You should get a soft and sticky dough.
4. Turn dough out onto a floured surface. Knead it lightly and roll into a 30cm-long log. The diameter should be 8 to 10cm. Add flour in small batches if the dough is too sticky.
5. Slice into 2cm-thick pieces and place on a baking tray lined with parchment paper. Brush the tops lightly with whipping cream.
6. Bake 10 to 12 minutes or until golden brown.
7. Remove from oven and leave to cool on a wire rack.
Makes about 15 scones
Tips:
1. The scones tend to be rather bland, so they must be eaten with jam or butter, or dipped into coffee.
2. As the dough can be quite sticky, make sure you have plenty of extra flour on hand.
3. Other recipes use fizzy lemonade instead. Do not use that, as the scones will have a sour aftertaste.
Eunice Quek
49. MILO BOWL CAKE


What: This three-step recipe for a Milo bowl cake gives you a fuss-free dessert in less than five minutes.
It is no surprise that this recipe went viral when it first appeared on Buzzfeed Australia in 2015.
The aromatic malted chocolate-flavoured cake comes out of the microwave oven with a dense and slightly sticky texture. Enjoy it with a scoop of vanilla ice cream.
Ingredients:
1 Tbs vegetable oil
4 Tbs self-raising flour
4 Tbs white sugar
4 Tbs Milo powder
3 Tbs fresh milk
1 egg, beaten
4 Tbs vegetable oil
Method:
1. Brush a 15cm-diameter microwave-safe ceramic bowl with vegetable oil.
2. Combine all the other ingredients in the bowl and mix well.
3. Heat the mixture in a microwave oven for three minutes at medium-high setting.
4. Garnish with a scoop of vanilla ice cream and serve.
Serves two
Tip: The cake is best eaten within 30 minutes after it is cooked, before it hardens.
Kenneth Goh
BOOZE HACKS: Booze